Working with cryptocurrency usually begins with creating and setting up a wallet. After all, it’s the wallet that lets you both store and manage your assets.
Although newcomers may find it hard to understand how cryptocurrency works, setting up and installing a wallet is usually straightforward.
The main thing in this matter is to understand the basic principles and follow safety rules.
How a cryptocurrency wallet works: a simple explanation
Before getting into how to configure a wallet, it's important to understand what it is and how it works. This will help avoid mistakes when customizing.
In this article we will cover the most important points. If you want to delve deeper into the topic of crypto wallets, read a separate article about them.
What is a crypto wallet
A cryptocurrency wallet is a specialized tool that allows you to access your assets stored on the blockchain and manage them. In other words, it is not a repository in the traditional sense, because the funds are not actually held in it.
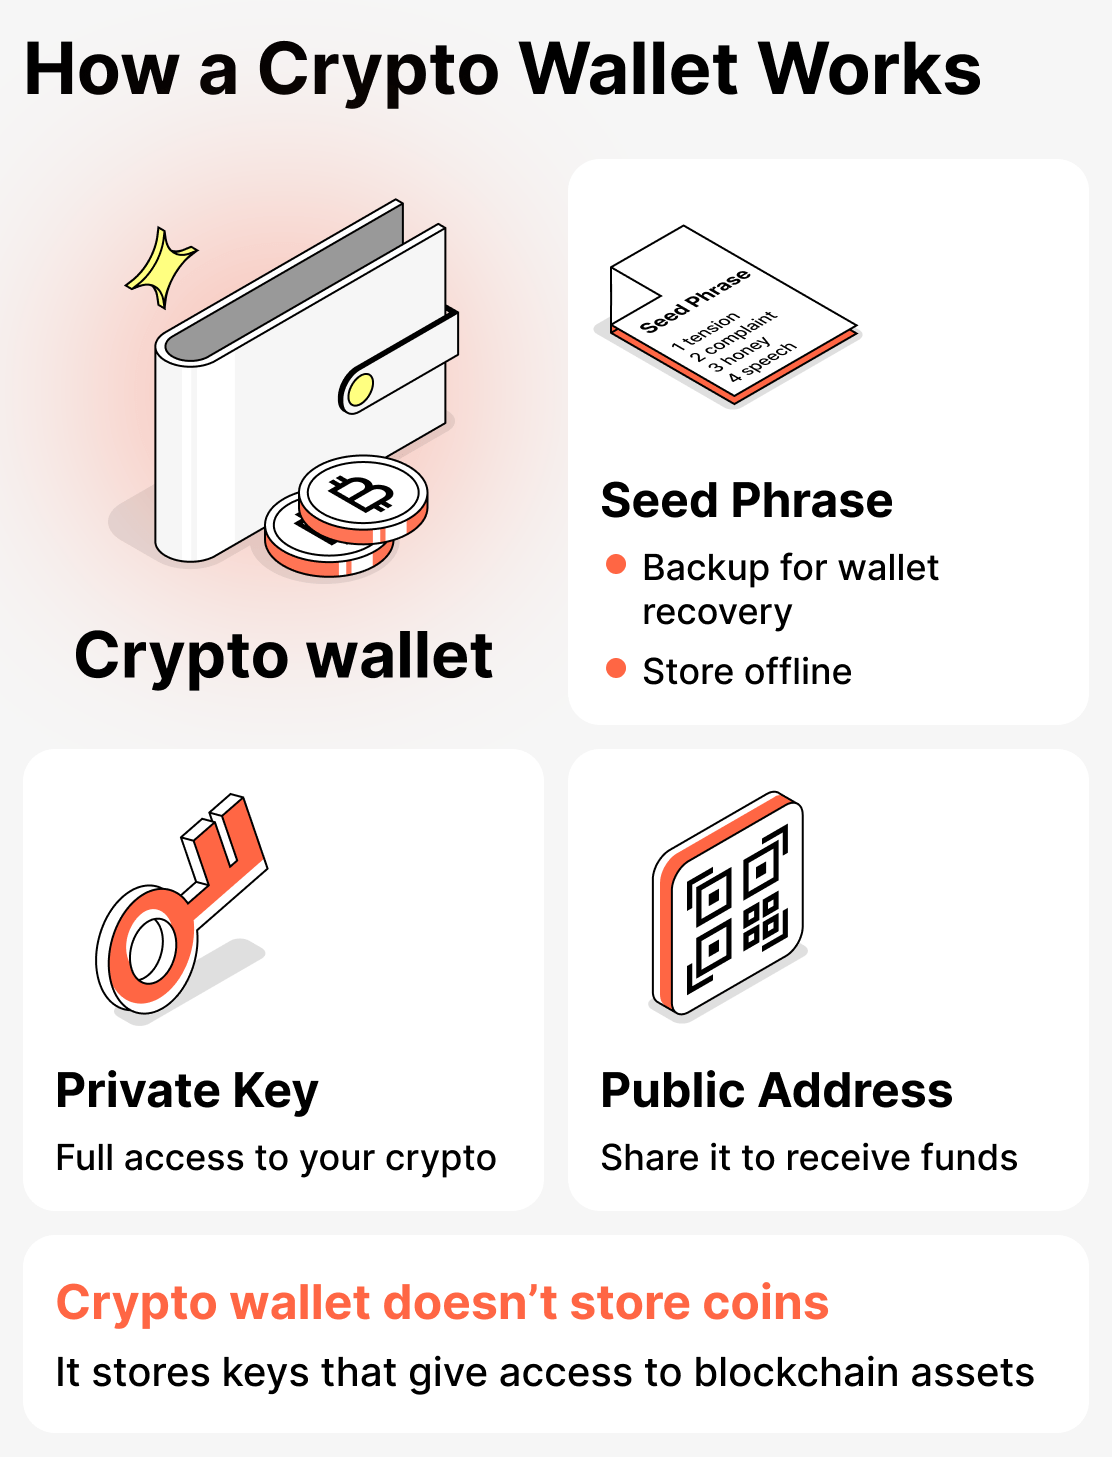
Private key and its role
This is exactly what “opens the door” to your vault. Whoever holds the private key owns the cryptocurrency. This key must not be given to anyone! Keep it safe and handle it with care!
Public address: what it is and how it's used
This is equivalent to a bank account to which funds can be sent. It can be freely shared with other people.
Seed phrase: why it's needed and how to store it
This is a set of 12-24 random words. A kind of password or code. A seed phrase can be used to restore the private key.
That is, if you lose access to your wallet, only the seed phrase can help. Naturally, this code must not be sent or shown to anyone. It's best to write it down on paper and hide it in a safe (or in any other secure place).
Before starting the wallet creation and setup process, make sure you have everything you need.
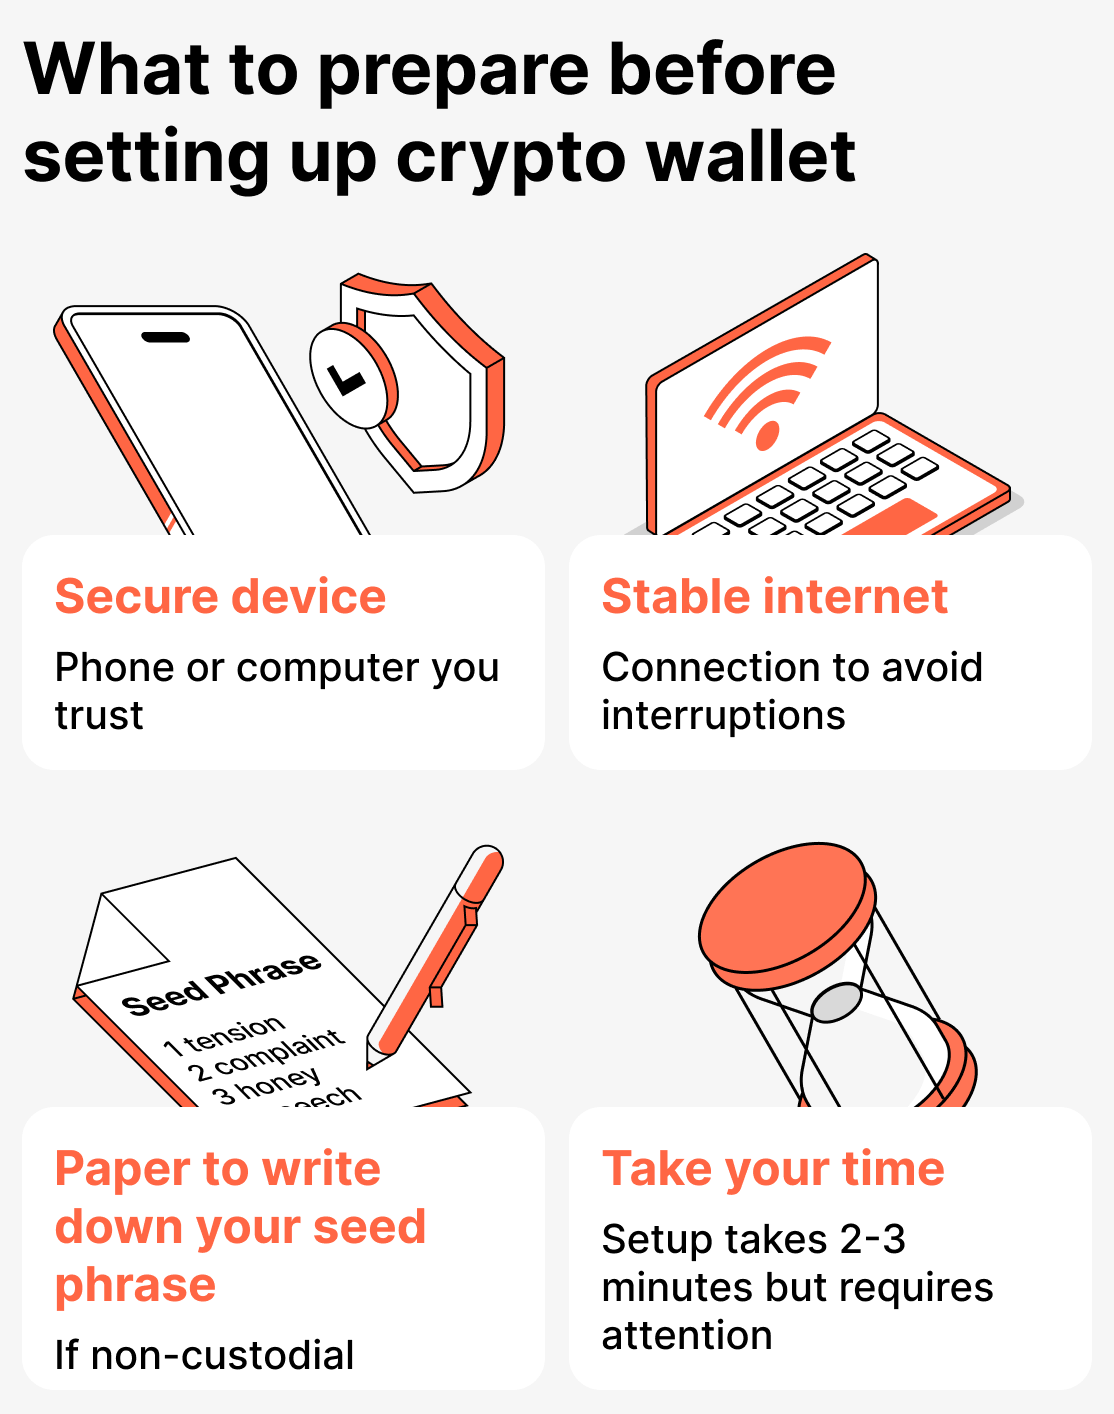
First, choose a secure device for the installation. It should be a smartphone or computer that you trust and use regularly. Make sure the device has a password or biometric login (preferably). It's important to use a trusted device to install your crypto wallet, as access to your funds will be made through it.
Also make sure you have a stable internet connection. The setup takes only a few minutes, but if the connection is lost at an inopportune moment it may cause a failure that interrupts the installation or prevents further configuration.
If you are creating a non-custodial wallet, prepare a sheet of paper in advance to write down your seed phrase. It will be generated together with your wallet.
Check the website you’re downloading the wallet app from. This is especially important if you’re installing it on a computer. If you want to download the app to a phone — look for it only in official stores (App Store or Google Play).
And finally, focus your attention on the installation and setup process. Everything is actually quite simple, but you still need to be careful. Most mistakes occur because users rush, causing them to make errors or skip important setup steps. If you approach this matter with due seriousness, you'll configure the wallet in a couple of minutes, after which you can begin working with cryptocurrency without any concerns.
Detailed instructions for setting up a wallet

Overall, all wallets are set up and installed in a similar way. Let's walk through the most typical customization process step by step:
Step 1. Download the app from the official source
Naturally, to get started you need to download the wallet app. Beginners often don't know what or where to download it from, and end up making mistakes and putting themselves at risk.
Important: download the wallet only from an official source (the wallet's website, the App Store, or Google Play).
Before installing, make sure to check the wallet's official page, read user reviews on third-party sites, and review the information provided by the developers.
Do not download wallets from ads or third-party sources!
Step 2. Create a new wallet
When you install the wallet, you will be prompted to register. Complete the registration and follow all the steps through to the end. Once you have completed registration, the wallet will be created.
Sometimes registration and wallet creation are separate. In that case, you first complete registration, and then create the wallet itself by selecting the appropriate function.
Step 3. Create and write down your seed phrase
A seed phrase is often created along with the wallet. You will be prompted to choose from 12 to 24 words in a random order. Write down each word you choose immediately on paper — after completing installation and setup, hide it in a safe place.
Step 4. Confirm the seed phrase
When you enter the seed phrase, the app will ask you to enter all the words in the correct order. This is how the service checks whether you have written down the code.
Step 5. Set a PIN, an additional password, or enable biometric login
After installation and registration, you can proceed to the setup and connect the key features.
To get started, go to the Security section and enable all available protection levels provided by the wallet.
At minimum, you can set an additional password (which will be required for every transaction) and a PIN code that will be requested when logging into the app.
Most services have already integrated the ability to log into your account using biometrics. If such a feature is available — be sure to enable it.
You can also enable additional security settings, such as push notifications for transactions, two-factor authentication, and other options. We also recommend enabling them if they are offered.
Step 6. Top up your wallet
After you create and secure your wallet, you should fund it immediately to check whether any funds will be received.
This is how you can:
- transfer cryptocurrency from an exchange;
- receive a transfer from another person;
- import an existing wallet using a seed phrase;
- buy cryptocurrency within the app (if such a feature is available).
You don't need to deposit a large amount right away. For your first deposit, the minimum amount is sufficient. This is done only to verify that everything is working correctly.
Step 7 Make a test transfer
Before sending large amounts, always make a small test transfer first.
This will allow you to verify that you have selected the correct wallet address and network, and that the application is working without errors.
How to install and set up Cropty Wallet: a detailed guide for users
Cropty Wallet — a crypto wallet designed so every user, regardless of experience, can enjoy the best possible cryptocurrency experience.
This wallet is created very quickly and without a seed phrase. You will only need to enter your email address or phone number as your login, then confirm your registration.
All of this makes the setup process simpler and safer for most users.
Next, we'll look at how to install and set up Cropty Wallet from A to Z:
Step 1. Download the app or open the web version
Cropty Wallet is available for download on the App Store or on Google Play. Also available is the web version. Use whatever is most convenient for you.
Step 2. Create an account
After installing the wallet, complete the registration.
You only need to enter your phone number or email and confirm your registration.
A confirmation code will be sent; enter it in the corresponding field.
We have a separate article where we explain in detail how to use a crypto wallet. Read it for a more detailed guide.
Step 3. Configure security settings
After creating your wallet, go to the Security section and enable all levels of protection offered by the wallet:
- PIN code;
- Sign in with FaceID or fingerprint;
- Two-factor authentication;
Step 4. Top up your wallet
You should do this immediately after installation to check that everything is working. Simply transfer funds from another one of your accounts or receive them from another user.
We have a separate article about how to send and receive assets. Check it out.
Security rules for using and setting up cryptocurrency wallets
When dealing with finances, security is a very important concern. To help you install and set up your wallet with minimal stress, we've prepared a set of practical tips:
- Check the link you are following before downloading the app;
- Do not use public Wi-Fi networks (shopping malls, other public venues) when setting up your wallet;
- Monitor the device's condition and security. Install updates promptly, enable reliable antivirus protection, and set a screen lock;
- Never enter your seed phrase on third-party websites;
- Do not click on links in suspicious messages;
- Always make test transactions before sending large amounts.
As for Cropty Wallet, it's even simpler. You won't need to worry about the safety of your seed phrase, since it simply doesn't exist. The other tips we listed above are also relevant to Cropty Wallet.
Summary: What to remember when setting up and installing a cryptocurrency wallet
Setting up a crypto wallet is a simple but important step that everyone goes through when they first install a new app. The security of your assets depends on how carefully and responsibly you approach it.
In general, all crypto wallets are set up similarly. However, there can be occasional differences.
Cropty Wallet, for example, simplifies the process of creating a wallet and restoring access because it does not use a seed phrase. And the support team with live specialists will always help resolve any issues that arise.
If you set up your crypto wallet correctly, you can be sure that your funds are well protected and the app works exactly the way you want it to.